


Healthy treats use ingredients from your pantry. We focus on peanut butter, pumpkin, and oats for budget-friendly snacks dogs adore. These recipes are quick to prepare, perfect for involving kids, and dogs love the flavors.
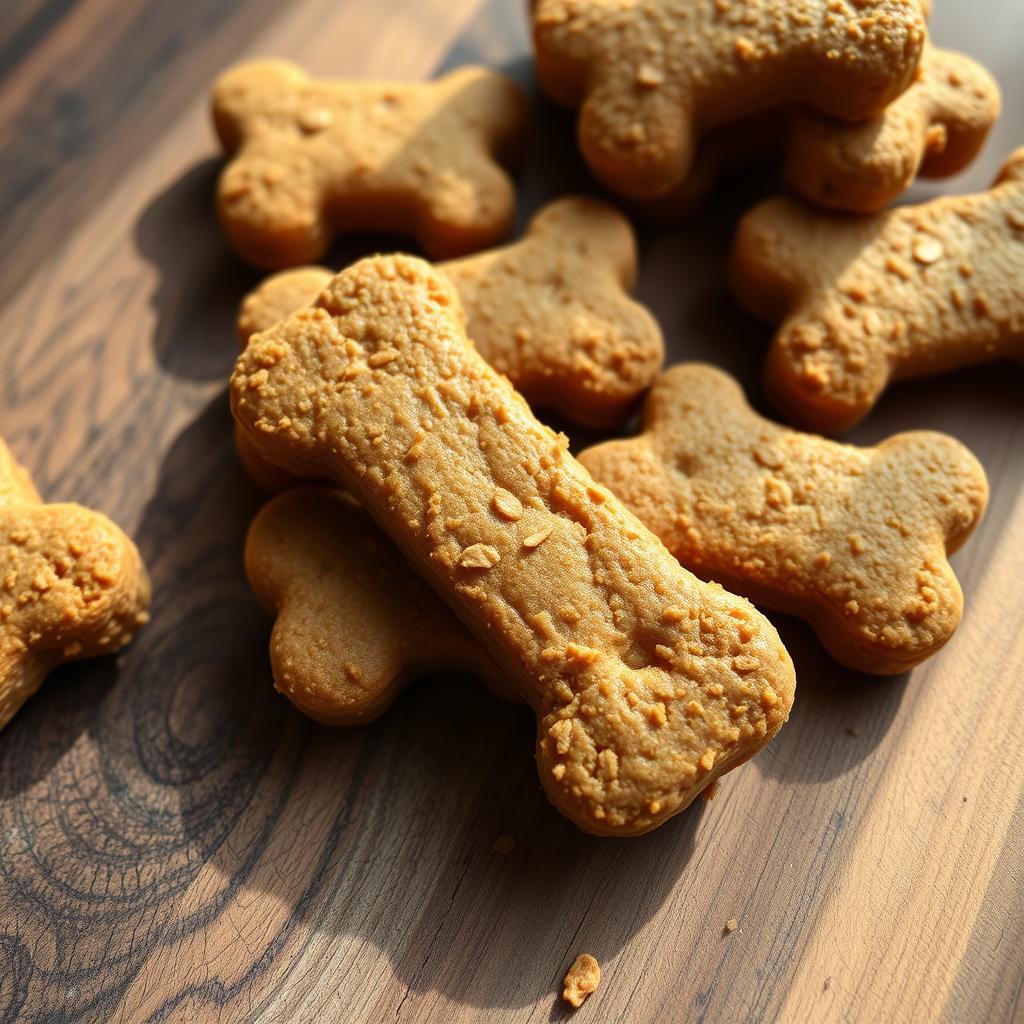
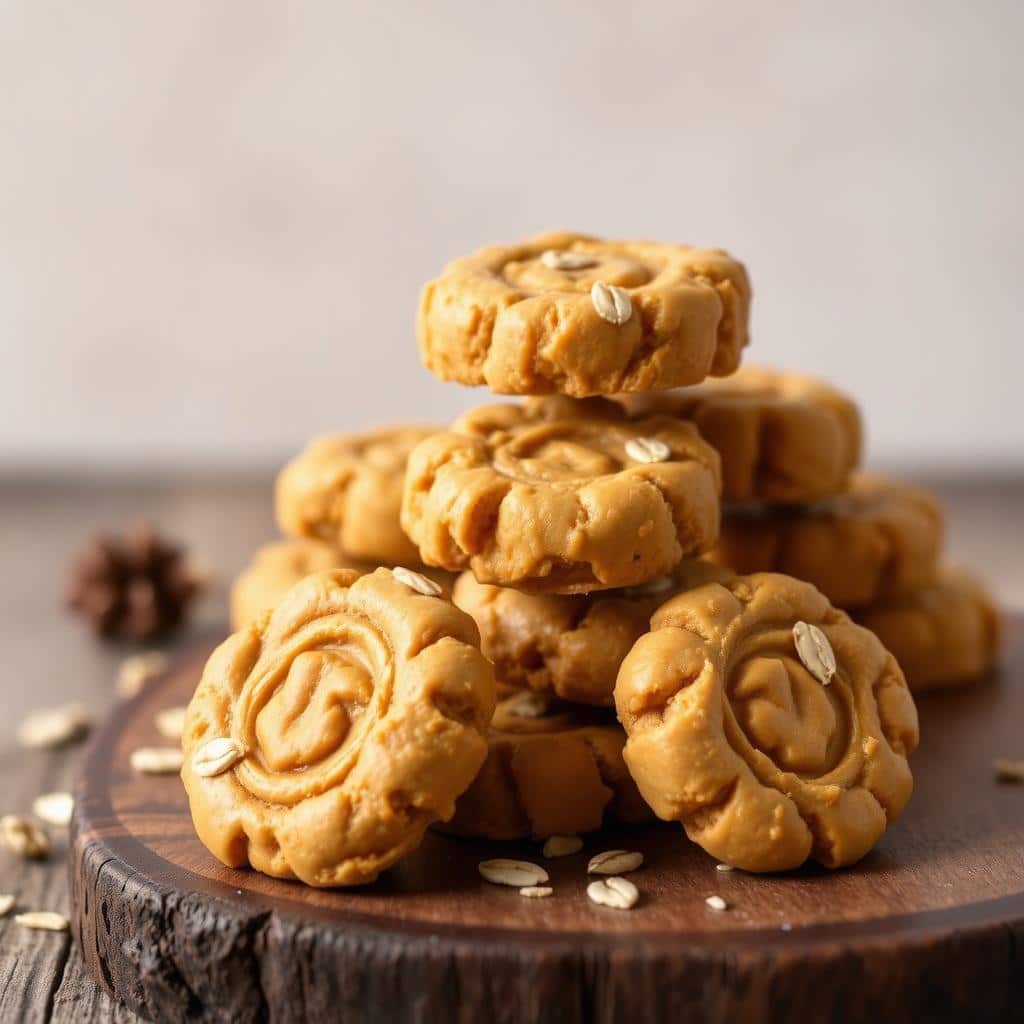
Let’s start with dog biscuits that only need four ingredients: rolled oats, pumpkin purée, peanut butter, and an egg. It takes about 30 minutes from start to finish, using a food processor to clean up easily. You’ll get around 85 pieces, each with 19 calories, if you roll the dough to 1/8 inch thick and bake at 350°F for 16–18 minutes. Remember to rotate the trays and let them cool completely. If the dough is sticky, lightly flour your board and pin or use a fork for simpler shapes.
For those who favor no-bake treats, we’ve got a three-ingredient recipe: pumpkin purée, peanut butter, and oats. Just roll them into small balls and refrigerate for an hour. Be sure to use 100% pumpkin purée and peanut butter without xylitol for safety. These can stay in the fridge for a week or be frozen for three months.
Adding applesauce and plain yogurt offers another twist on homemade dog treats with oats. It’s best to choose organic, unsalted, and sugar-free options. Always check with your vet before introducing new foods to your pet’s diet.
You can adjust these recipes for your dog’s needs. Create softer treats for older dogs or those with dental issues. Try mixing in banana with pumpkin for a different flavor. Making your own treats is cheaper than buying them, and making them can be a fun way to spend time with your pet.


This guide covers everything from no-bake treats to simple four-ingredient biscuits. We’ll also share tips on how to keep your homemade treats fresh.
Why Peanut Butter, Pumpkin, and Oats Make Dog-Friendly Treats
Simple ingredients make great snacks for dogs. Choose mixes for baking with a focus on safety and cleanliness. Pumpkin, peanut butter, and oats mix taste, texture, and nutrition for rewards.
Benefits of pumpkin puree for digestion and vitamins A, C, and E
Plain 100% pumpkin purée aids digestion with natural fiber. It also gives vitamins A, C, and E for wellness. Use fresh or canned purée, avoiding pumpkin pie mix or spice.
Choosing safe peanut butter: avoid xylitol and added sugars
Pick unsalted peanut butter without added sugar for your dog. Make sure it’s free from xylitol, a harmful sweetener. Brands like Smucker’s Natural or Trader Joe’s offer natural options.

Why oats work: gentle fiber and binding texture
Rolled or quick oats offer a gentle taste and fiber. They help dough stick together for shaped treats. Grinding them creates a tender texture without using wheat.
Allergy and sensitivity considerations: consult your veterinarian
Every dog reacts differently, so watch for any negative signs. If your dog has allergies, talk to your vet first. Always read labels for simple, safe ingredients.
Healthy Dog Biscuit Recipes
These recipes are easy and use things you likely have at home. They include oats, pumpkin, and peanut butter, all safe for dogs. The aim is to keep it simple with clean ingredients that dogs love.
Quick baked four-ingredient biscuits with rolled oats
To make a quick treat, try 4-ingredient dog biscuits. First, blend 3 cups oats until coarsely ground. Then, add 1 cup pumpkin purée, 1/3 cup peanut butter, and 1 egg. Roll out the dough thinly, cut into shapes, and bake at 350°F for 16–18 minutes.
Halfway through, turn the trays for even browning. Let them cool on racks. This recipe makes lots of treats for your dog or to fill your treat jar.
No-bake pumpkin, peanut butter, and oats bites
If you can’t use the oven, try no-bake treats. Mix 1 cup pumpkin purée with 1/2 cup safe peanut butter and 2 1/2 cups oats. Form small balls and chill for an hour.
Store these bites tightly sealed in the fridge for a week or freeze them. They’re great for quick rewards and last a while.
Soft options for seniors or dogs with dental issues
Older dogs or those with teeth problems may need softer treats. Soft pumpkin treats are easy to chew. They’re made with moist ingredients and baked for less time. Or, mix pumpkin with applesauce or yogurt and oats for a no-bake option that’s also soft.
Shape them with a small scoop and press them down. This makes them easy to handle and chew.
Banana-pumpkin variations to switch up flavor
If you want to mix things up, add banana to the mix. Combine ripe banana with pumpkin. Then, add oats and a bit of peanut butter. This variation sticks to the 4-ingredient recipe style.
For a fun change, shape them into coins, mini bones, or bars. These treats bring in a new flavor while keeping ingredients safe for dogs.
Step-by-Step: Baked Peanut Butter Pumpkin Oat Biscuits
These tasty dog biscuits are quick to make and turn out crispy. They use simple ingredients and easy steps. This way, you can make treats that taste great and are good for your dog.
Grind rolled oats to a coarse flour in a food processor
To make oat flour, put 3 cups of rolled oats in a food processor for 2–3 minutes. You want it mostly fine but with some bits left. An 11‑cup Cuisinart does this job well, giving the right texture to make the dough stick together.
Mix pumpkin puree, peanut butter, and egg until uniform
Next, mix 1 cup of pumpkin purée, 1/3 cup of natural peanut butter, and 1 egg into the oat flour. Just pulse until the dough seems smooth. This step is mess-free and speeds things up, perfect for a 350°F dog biscuit recipe.
Roll to about 1/8 inch, cut shapes, and bake at 350°F
Roll out the dough on parchment paper to 1/8 inch thickness. Use a rolling dowel and, for fun, pick bone-shaped cutters about 2 inches across. Place them on a baking sheet and bake at 350°F for 16–18 minutes. Remember to flip the trays halfway through. Let them cool down before your dog tries them.
Troubleshooting sticky dough and flouring the surface
If the dough is too sticky, sprinkle your counter with some flour. Knead it gently until it’s easier to work with. Don’t want to roll it out? Just scoop and flatten with a fork, peanut butter cookie style. Bake as usual.
Batch size expectations and bone-shaped cutter tips
Expect around 85 two-inch biscuits from this recipe, which makes about 7 dozen. Each has about 19 calories. Feel free to use different sized cutters for variety or gifting. Package the biscuits in paw print bags for a special, bakery-like presentation.
No-Bake Peanut Butter Pumpkin Oat Treats
These dog treats are quick to make and don’t need baking. They use simple ingredients and are easy on the budget. They are also easy to make in big batches for training treats.
Three-ingredient base: pumpkin puree, peanut butter, oats
Start with 1 cup of pumpkin purée, 1/2 cup of peanut butter, and 2 1/2 cups of oats. Whether you use old-fashioned or quick oats, they both work great. This mix creates treats that dogs love, they’re easy to make and tasty.
Mix, roll into bite-size balls, and chill to set
Mix the pumpkin and peanut butter until they’re smooth. Then, add the oats. If the mixture is thick, mix with your hands. Shape the mix into small balls. Place them on parchment paper. Chill for 1 hour before moving to an airtight container. This keeps the treats fresh.
Portion sizes for small and large breeds
For large dogs, like a 100-pound German Shepherd, create ping-pong-sized treats. Smaller dogs, around 20–25 pounds, should get marble to grape-sized bites. Give them as rewards but in moderation. Adjust the size to the dog’s activity level. These are great for training.
Optional add-ins: applesauce or yogurt from pantry-safe recipes
Add 1/2 cup applesauce and 1/4 cup plain yogurt for variation. Use unsweetened and low-sodium versions. Always read the labels. Chill the treats after shaping for the best texture.
Silicone molds, pulsed oats, and training-sized bites
For special shapes, use silicone molds. If your dog prefers smoother treats, pulse the oats in a food processor. Make pea-sized treats for quick training rewards. They’re perfect for short training sessions.
Experiment with shapes and sizes but keep the base the same. These treats are great for busy days. They save time in the kitchen and keep ingredients known and safe.
Storage, Freezing, and Shelf Life for Homemade Dog Treats
Keeping treats fresh is as important as how they taste. Knowing how to store homemade dog treats is key. Use clean, sealed containers and pick the right storage for the treat type and your area’s weather.
Refrigeration timelines for baked and no-bake treats
Store baked dog biscuits in a sealed container in the fridge for up to 2 weeks. No-bake treats can last about a week in the refrigerator. They might need chilling soon after making if they contain moisture-rich ingredients like yogurt.
Freezer storage up to three months and thawing tips
Freezing dog treats, both baked and no-bake, can extend their life for 3 months. Use zip bags or containers suited for freezing, remove excess air, and remember to label. Thaw treats in the fridge overnight or at room temperature for a short time to keep them enjoyable.
Humidity considerations for countertop storage
Dry and cool houses allow for counter storage in closed jars for a few days. In damp areas, store your treats in the fridge to keep them from getting soft. Using a silica gel packet in the container can help, but don’t let it touch the treats.
Labeling containers and rotating small batches
Label containers with the treat type and baking date. Rotate treats from freezer to fridge to use. This keeps everything fresh, reduces waste, and makes sharing or daily feeding easier.
Safety Notes and Ingredient Shopping Tips
Begin with simple, 100% pumpkin puree for your dog. Avoid pumpkin pie mixes and spices, as nutmeg can be harmful. When picking peanut butter, choose brands without xylitol and stay away from added sugars or sweeteners. Picking safe dog treats starts with what you choose from the store.
Reading labels on dog treats should become a regular thing. Look for labels saying “unsalted,” “no sugar added,” and those with short lists of ingredients. Choosing organic and gluten-free options can cut down on unwanted additives. Some well-known brands without xylitol are Smucker’s Natural, Teddie, Justin’s Classic, and Crazy Richard’s.
Before adding anything extra like yogurt or applesauce to dog treats, it’s smart to talk to your vet. This is especially important for dogs with food allergies. Also, adjust portions based on your dog’s size and use quick oats for a smoother dough that’s easier to roll out.
Make baking easier by lining your pans with parchment or a Silpat. This prevents sticking. When shaping the dough, press it down lightly to keep it workable. Rotate your baking sheets halfway through to ensure everything cooks evenly. For treats that don’t need baking, let them chill for about an hour to firm up. Using silicone molds helps keep each treat the same size.
Let the biscuits cool completely before you store them. This helps prevent mold from moisture. If you are giving them away, package them in bags marked with paw prints so everyone knows they’re for dogs. Remember these tips for safe dog treats each time you’re buying ingredients or making them.
Conclusion
This roundup of Healthy Dog Biscuit Recipes shows how easy ingredients can make a big difference. Making them takes about 30 minutes and you only need a few kitchen tools. The no-bake recipes are even quicker: just mix, roll, and cool for an hour.
No-bake treats with applesauce and yogurt are great for dogs that prefer a softer snack. It’s easy to make these treats part of your regular routine.
Always think of safety first. Use safe ingredients like 100% pumpkin puree and xylitol-free peanut butter. Avoid anything that might not be safe, like pumpkin pie spice or fillings.
If your dog has allergies or health issues, check with your vet first. This is important if you’re trying new foods or homemade treats.
Storing these treats is easy. Keep baked treats in the fridge for up to two weeks and no-bake treats for a week. You can freeze them for three months.
In places with lots of humidity, don’t leave treats out for long. Always label and date your treat containers. This helps keep treats fresh and tasty.
Feel free to adapt these recipes. Change the size of the treats based on your dog’s size and needs. You can also try different shapes or textures.
With ingredients like peanut butter, pumpkin, and oats, you’re making healthy treats. They’re good for your budget, nutritious, and easy to make again. Sharing these treats with friends is fun, especially when you make a lot.


Discussion about this post